


This is the second step in the story of Hashi@Home, where we start putting our newly-created Consul cluster to some actual use. I’ll try to outline where I think I’m going with this, by explaining some of the the things I think I need in my home compute environment.
Workload Orchestration
Keep your HAT on
Many of the compute bits in my office have special bits of hardware attached – HAT’s in the raspberry pi lingo, standing for Hardware Attached on Top.
Part of my Grand Scheme was to have physical objects in my office to work with me through the day. I wanted to spend less time staring at a screen and have a bit more sensory input from the physical world. Even before the plague hit, I was spending way too much time to be considered healthy sitting down in front of a computer. I wanted something like an old-school alarm clock that I had to walk across the room to touch in order to interact with – except, like, a smart alarm clock.
So, I started browsing the Pi stores for fun ways to turn my compute bits into actual robots that could be interacted with physically. At the time of writing, I have:
- one Sense HAT
- two Scroll HAT minis
- one paper HAT

Putting the HATs to work
In order to do anything useful with these HATs, one typically uses a Python library designed specifically for the HAT in question, usually written in python1.
My early attempts to put these HATs to work was pretty old school: I’d log into the compute bits2, get the scripts that invoke the respective libraries and run them ad-hoc.
A step further would be to invoke them via a screen or even via a systemd unit.
However, this makes it quite difficult to have “multi-user” access to the hardware.
If there’s a script running, let’s say a digital clock on the scroll hat, then nothing else could use that piece of hardware.
I pondered this for a while, and came to the realisation that I need something to orchestrate payloads based on some higher-lying rationale.
This realisation was perhaps the strongest initial impetus to use Nomad for this reason.
Deployment
Since I’d already deployed Consul on the “datacentre” Nomad would be deployed as a “service”, hopefully along with relevant health checks, DNS entries, etc.
Nomad documentation is no exception to the “Hashidocs are awesome” rule, so after a once-over of the introductory tutorials, I felt ready to follow the “Production dpeloyment guide”.
Similarly to Consul, Nomad is a distributed system, with auto-discovery of agents, a single binary executable and well-documented configuration language. I wanted a topology with a single Nomad server and a set of nomad agents, to be defined later.
A concern was to keep from overloading the limited resources provided by my computatoms, so for example I decided to avoid making the Pi-Zero’s agents since wouldn’t provide much compute power anyway. In due course, I would need them to be agents of course, since this is where the scroll HATs were attached.
The Hashidocs outline a clear and concise path to getting the server and agents onto the targets and configuring them, but I wanted to follow the Hashi@Home way of doing bootstrap deployment with Ansible.
Nomad Ansible role and inventory update
The first thing I did was add a new group to my inventory to declare which computatoms would be designated as Nomads:
[nomad_agents:children]
pi3s

[nomad_servers]
inky.station
This designated a single Pi3 as the server and all the Pi3s as agents – of course, this meant that one of them (inky) would be running both as agent and server, something which the docs discourage.
Hey, we live on the edge in Hashi@Home!
Next, I wrote the role to deploy Nomad and template the configurations for the application itself, as well as the systemd unit which would control it.
The only part worth mentioning was that the server.hcl part had to be templated only if the target was a Nomad server, according to the group it was in:
- name: Template server configuration
  become: true
  template:
    src: etc/nomad.d/server.hcl.j2
    dest: /etc/nomad.d/server.hcl
  when: (is_nomad_server | default('false')) | bool
Role written, it was then applied to the DaTaCenTrE…
It works
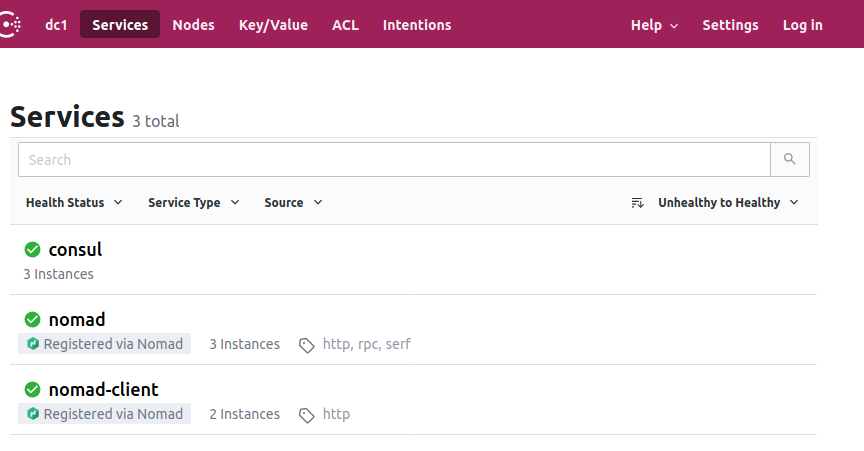
On the Consul UI, we can now see two new services: nomad and nomad-client which were registered by Nomad itself, thanks to the assignment of the name of the datacentre.
I must say, this is a very comfortable way to deploy a service.
Not that I was surprised, but the DNS also worked:
22:41:35 in ~/Ops/personal via ansible-2.10
➜ dig @sense.station -p 8600 nomad.service.consul

; @sense.station -p 8600 nomad.service.consul
; (1 server found)
;; global options: +cmd
;; Got answer:
;; HEADER opcode: QUERY, status: NOERROR, id: 48015
;; flags: qr aa rd; QUERY: 1, ANSWER: 1, AUTHORITY: 0, ADDITIONAL: 1
;; WARNING: recursion requested but not available

;; OPT PSEUDOSECTION:
; EDNS: version: 0, flags:; udp: 4096
;; QUESTION SECTION:
;nomad.service.consul.    IN  A

;; ANSWER SECTION:
nomad.service.consul.  0  IN  A  192.168.1.14

;; Query time: 3 msec
;; SERVER: 192.168.1.16#8600(192.168.1.16)
;; WHEN: Sat Jan 09 22:41:39 CET 2021
;; MSG SIZE  rcvd: 65
As you can see, we have one node reporting as a Nomad server serivce3. The client DNS also reported correctly:
➜ dig +nocmd @sense.station -p 8600 nomad-client.service.consul
;; Got answer:
;; HEADER opcode: QUERY, status: NOERROR, id: 39470
;; flags: qr aa rd; QUERY: 1, ANSWER: 2, AUTHORITY: 0, ADDITIONAL: 1
;; WARNING: recursion requested but not available

;; OPT PSEUDOSECTION:
; EDNS: version: 0, flags:; udp: 4096
;; QUESTION SECTION:
;nomad-client.service.consul.  IN  A

;; ANSWER SECTION:
nomad-client.service.consul. 0  IN  A  192.168.1.10
nomad-client.service.consul. 0  IN  A  192.168.1.14

;; Query time: 3 msec
;; SERVER: 192.168.1.16#8600(192.168.1.16)
;; WHEN: Sat Jan 09 22:46:22 CET 2021
;; MSG SIZE rcvd: 88Voilà
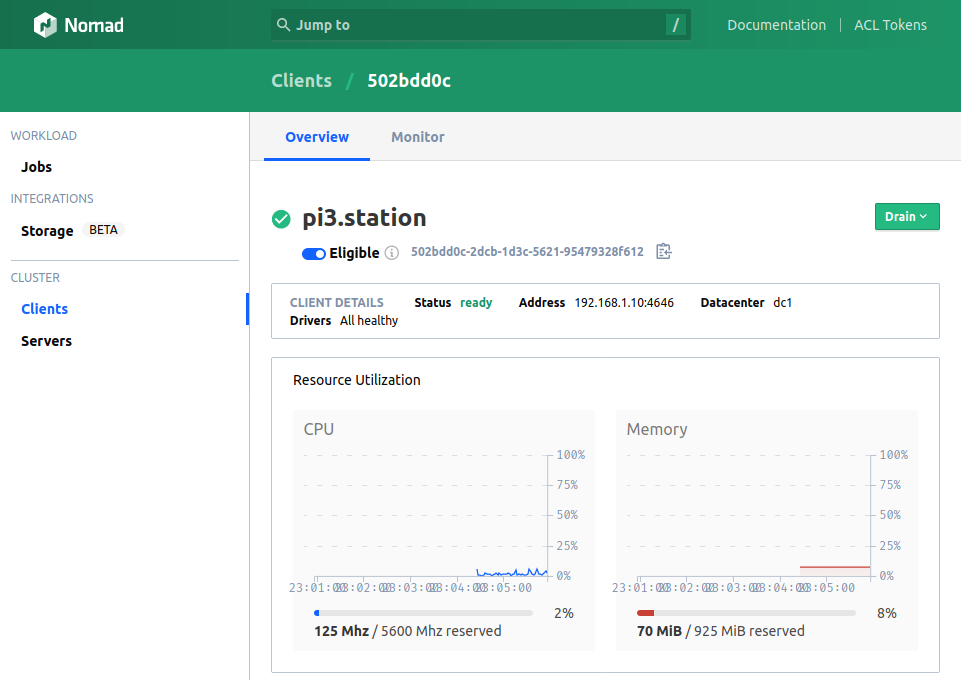
And so, in less than 2 hours of work, from scratch, we have Nomad deployed on our “datacentre”. Poking around the user interface, I can see that the clients are registered and ready to accept jobs:
Next
So: we have a Consul cluster, with a Nomad server and agents waiting to accept work. There is plenty left to do of course, not least properly securing both of these.
I performed the initial bootstrap with Ansible, mostly because there was no suitable Terraform provider to use against my rasbperry pis. However, now we have some providers which we can indeed Terraform!
The next steps should be written mostly in Terraform. As a neat side-effect, I also have a resilient backend for the state of this datacentre, in the new Consul cluster KV store.
So, next we will be Terraforming Consul and Vault’s ACLs, as well as the first few applications deployed on Nomad.
One uncertainty still remains though, which hopefull will become clear during the next few iterations, and it’s all about change management4.
How do we do continuous integration and delivery of changes?
I can see a use for Waypoint here, but I can’t exactly see how just yet.
There’s a topic open though, over at the Hashi forum – watch that space!
References and Footnotes
-
For example, the Sense HAT library and Scroll pHAT mini ↩
-
I would colloquially call computers “machines” in the past, but these things are really too small for that to feel right, so I’m just going to call them compute bits. Maybe I’ll call them computatoms later. ↩
-
Astute observers will note that I’m using the raddest of shells (Zsh), with Ansible-2.10. ↩